This Help article provides instructions for Organisation account users to share their surveys with other online surveys users via the ![]() Survey permissions functionality.
Survey permissions functionality.
Using the survey permissions functionality, you can give full or limited access to a survey to other online surveys users. You can, for example, allow another user full access to the survey, or restrict the access so that they can view the results but not edit the survey, or launch the survey but not view the results, and so on. This enables collaborative working within and across organisations.
If you are not a member of an Organisation account, or you wish to share your survey with someone outside of online surveys, please see our FAQ on sharing your survey/data for other ways to share your survey.
A note on survey permissions
If you are registered in an Organisation account, any new surveys that you create are restricted so that only you have full access to them. This means that nobody else can edit, launch or analyse your survey unless you use the survey permissions functionality to explicitly grant another online surveys user the ability to do so.
We recommend that all online surveys users in an Organisation account add at least one other user to their survey permissions list. This ensures that someone else can work on your survey if you are on leave.
To share your survey with another user:
- Check that the person that you want to share the survey with has an active online surveys user account.
- You can only share a survey with another online surveys user. If the person you want to share the survey with does not have a online surveys user account, they will need to request one from the online surveys account administrator at their institution.
- On your Dashboard
 , find the survey that you want to share and click on the
  View/Edit survey permissions icon (or, from the Design tab of your survey, click on
  Survey permissions in the left-hand menu).
 - Any users who already have access to the survey are listed in the Survey permissions table, alongside their permission settings. To see your own permissions, click on + Show me at the top of the first column.
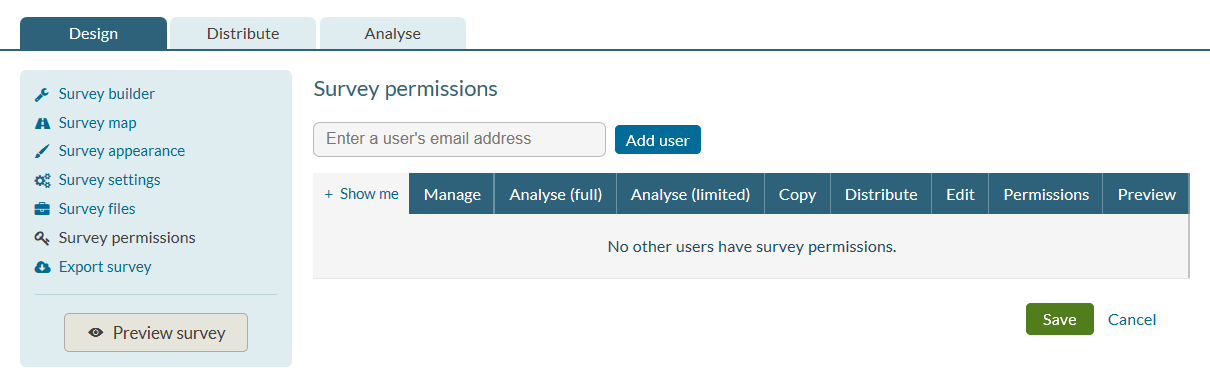
- Enter a user’s email address in the search box at the top of the table, and click Add user. (Note that the user has to be registered with this email address in online surveys.) The user will be added to the table.
- Tick the relevant permission(s) and click Save. The permissions are:
- Manage: the other user can:
- Analyse (full): the other user can see and analyse all responses to the survey.
- Analyse (limited): the other user can only see and analyse saved views of your survey responses that you have to specifically share with them.
- Copy: the other user can copy your survey and use it as a template for their own surveys.
- Distribute: the other user cannot launch the survey but can access all pages in the Distribute tab and can therefore:
- set up or amend survey access control details; and
- change any of the distribution settings.
- Edit: the other user can access the survey’s Design tab and can therefore:
- make changes to the survey structure (i.e. add/remove/edit questions & pages);
- change the survey appearance, change the survey settings and add or remove survey files; and
- export the survey structure.
- Permissions: the other user can change existing access permissions or give permissions to other users (but only those permissions they have themselves been given).
- Preview: the other user can preview the survey.
- If the user is in the same Organisation account as you, the survey will now appear in the other user’s Dashboard . If they cannot see the survey, tell them to untick the
 JUST MY SURVEYS box at the top of their dashboard.
 - If the user is in a different online surveys account (i.e. they are from another institution), the survey will now appear on the other user’s
 Shared surveys page, accessible at the top right of their Dashboard .
Repeat the steps above to give more users access to the survey or to edit someone’s permissions.
To hide a user from your permissions list and revoke all access to the survey, click the ![]() hide icon to the left of the username, then click Save.
hide icon to the left of the username, then click Save.