You can use routing to automatically have respondents skip one or more pages depending on their answer to a question.
This page explains how to:
- Add simple routing (or ‘skip-logic’) to a question.
- Test your routing.
- Trouble-shoot your routing.
Adding routing to a question
Start by setting up all the pages of your survey, including a final ‘Thank you’ page with no questions on it.
Routing only takes effect once a respondent clicks on the Submit and continue or Next button at the bottom of the page. Routing cannot be used to skip part of a page. If you want to use routing to allow your respondents to skip questions, those questions must be on a separate page.
In the  Survey builder:
 Edit the question you want to route from. This must be either a multiple choice (single answer) or selection list question and must not be a sub-question.
- In the question editor, click on the
 arrow next to the answer option that you want to use to make the respondent skip a page (or pages). This will expand the section and reveal additional options.
 - At If selected, jump to, click on the drop-down list and select the page you want to route to.
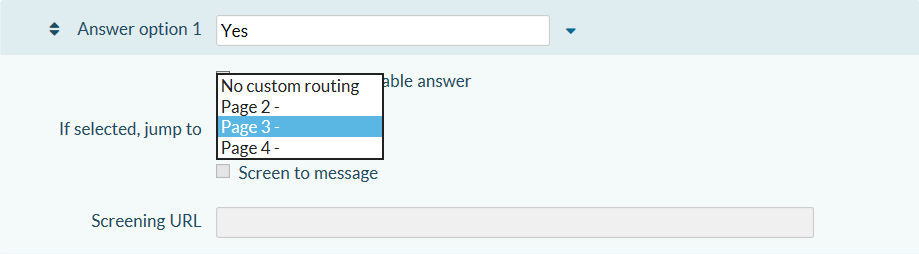
Please note the following restrictions:- You cannot route straight to the final ‘Thank you’ page.
- You cannot use routing to skip questions within a page. You must put the questions that you want your respondents to skip on a separate page.
- Click Save.

The ![]() Logic icon will now appear next to your question in the
Logic icon will now appear next to your question in the ![]() Survey builder.
Survey builder.
To add more paths, repeat steps 1–4.
Testing your routing
- Check your survey flow:
- Click on the
 Survey map link in your Design tab.
 - Check the diagram to see if the survey flow is correct. A red border around a box means the routing on that page is invalid.
- If you want to reset your routing, click on the Clear all logic button at the bottom of the page.
- Click on the
 Preview your survey to check all possible routes work as you intended.
- Pilot your survey thoroughly to check if your survey flow makes sense to respondents and that you end up with the kinds of results you need.
Trouble-shooting your routing
Here are some common reasons that your routing may not work as expected:
- You can only add routing to multiple choice (single answer) questions or selection list questions. Routing cannot be added to any other question type.
- Sub-questions cannot be used as routing questions.
- Ensure your routing question doesn’t point to the final ‘Thank you’ page of the survey. Your respondents must not skip the second-last page of the survey, otherwise they will not be able to click Finish and submit their answers.
- Ensure you have put the questions that you want your respondent to skip on a separate page. You cannot use routing to skip questions within a page.
- Check that the intended landing page for the question hasn’t been moved or deleted. Re-route your question to a different page, if necessary.
- Make sure you do not have more than one routing question on the same page. Move one of the questions to a new page, if necessary.
- Make sure you do not have a screening question and a routing question on the same page. Move one of the questions to a new page, if necessary.
- If in doubt, click the Clear all logic button on the Survey flow map and set up your routing again from scratch.